

3,000–5,000W Tipping Point: Choose 24V or 48V for Off-Grid Builds
3,000–5,000W Tipping Point: Choose 24V or 48V for Off-Grid Builds
For truly small mobile setups, or when every pound and inch is spoken for, 24V is still the right call. For most home, cabin, or expandable systems, 48V wins because it halves your current draw for the same wattage. That single fact changes your wire gauge, your inverter options, and how far your system can grow. We’ve built enough off-grid hardware at Westernharmonics to watch this decision play out both ways, and the pattern holds.
TL;DR:
- Using a 48V system can nearly halve the current compared to a 24V setup at the same wattage, significantly reducing wire gauge and heat losses.
- Systems exceeding 3,000 to 5,000 watts of continuous load benefit from 48V for better scalability, inverter options, and lower cable costs over long distances.
- Choosing 24V is suitable for small, mobile, or low-power systems under 3,000W, but expansion beyond that often requires costly rewiring and upgrades.
- Proper sizing of cables and components according to maximum load and peak current is critical to minimize losses, heat, and safety risks, especially at higher currents.
- Planning for future expansion and using dedicated design software simplifies comparing 24V and 48V setups, helping avoid costly reconfigurations later.
Table of Contents
- 24V vs 48V System Comparison: The Numbers That Matter
- The Electrical Math Behind Voltage Selection
- Which Batteries and Inverters Actually Pair With Each Voltage
- Matching Voltage to Your Project Type
- What Voltage Choice Actually Costs You
- Safety Basics Every Builder Should Know
- Your Practical Checklist for Choosing 24V or 48V
- How Design Software Removes the Guesswork
- Why 48V Won the Argument Faster Than I Expected
- How Westernharmonics Fits Into Your Voltage Plan
- Sources
24V vs 48V System Comparison: The Numbers That Matter
The choice comes down to amperage, and amperage comes down to voltage. Here’s what happens to current draw at three common power levels, using the Insum Energy comparison as our baseline math:
| System Power | Current at 24V | Current at 48V |
|---|---|---|
| 2,400W | ~100A | ~50A |
| 5,000W | ~208A | ~104A |
| 8,000W | ~333A | ~167A |
That’s not a rounding difference. At 5,000W, a 24V system pushes more than double the amperage of its 48V counterpart through the same length of copper.
24V advantages:
- Lower nominal voltage means fewer battery cells in series, which simplifies small builds
- Widely available in RV, marine, and small-cabin gear
- Cheaper entry point for compact solar arrays under roughly 2,000W
24V drawbacks:
- Current climbs fast as loads grow, forcing thicker (and pricier) cable
- Fewer high-capacity inverter options once you cross 3,000 to 4,000 watts
- Expansion often means a full rewire, not just adding panels
48V advantages:
- Half the current of 24V at the same wattage, which means thinner wire and less heat
- The default voltage for hybrid inverters and rack-mount LiFePO4 batteries
- Scales cleanly toward whole-home backup without a voltage change later
48V drawbacks:
- Slightly more complex BMS and cell-count requirements
- Overkill for a single 10 to 40-watt fan or a small mobile setup
The tipping point where most builders should switch from 24V to 48V sits around 3,000 to 5,000 watts of continuous load. Below that, 24V is fine. Above it, vendor guides consistently point to 48V as the more efficient, more expandable architecture.
The Electrical Math Behind Voltage Selection
Every system decision here traces back to one equation: P = V × I, or power equals voltage times current. Rearrange it and you get I = P ÷ V, which tells you exactly how much amperage a given wattage demands at any voltage. Double the voltage, and current drops by half for the same power output. That’s not a rule of thumb. It’s algebra.
Here’s what that looks like with real cable sizing:
- 2,400W system: 24V draws roughly 100A, needing 2/0 AWG for a short run. At 48V, the same load draws about 50A, comfortable on 4 AWG.
- 5,000W system: 24V draws about 208A, which pushes into 4/0 AWG or paralleled cable runs. At 48V, roughly 104A fits on 1/0 AWG.
- 8,000W system: 24V draws around 333A, a genuinely difficult wire-sizing problem requiring multiple parallel conductors. At 48V, about 167A still needs heavy cable but stays manageable on a single well-sized run.
Pro Tip: Always size cable for your maximum simultaneous draw, not your average load. A 5,000W inverter under peak surge can pull noticeably more current than its rated wattage suggests.
The reason lower current matters so much comes down to I²R losses, the heat generated as current pushes through resistance in your wire and connections. Because that loss scales with the square of current, cutting amperage in half doesn’t just halve your losses. It cuts them to a quarter. A 24V system running 200A through slightly undersized cable can waste real energy as heat and voltage drop before it ever reaches your battery or load. A 48V system moving 100A through the same cable barely gets warm.
This same current math governs your MPPT charge controller. A 60A MPPT controller charging a 24V bank tops out around 1,440 watts of usable solar input. Put that identical 60A controller on a 48V bank, and its ceiling jumps to roughly 2,880 watts, because the controller’s limit is set by amperage, not by the wattage of your panels. That’s a detail a lot of DIY planners miss when they size an array by wattage alone and then discover their controller can’t actually handle it.
The practical upshot: designing at 48V can cut the number of MPPT controllers you need in half for the same solar array, since each controller effectively doubles its wattage handling at the higher voltage. If you’re planning a 4,000-watt array, that’s the difference between running two 60A controllers or one.
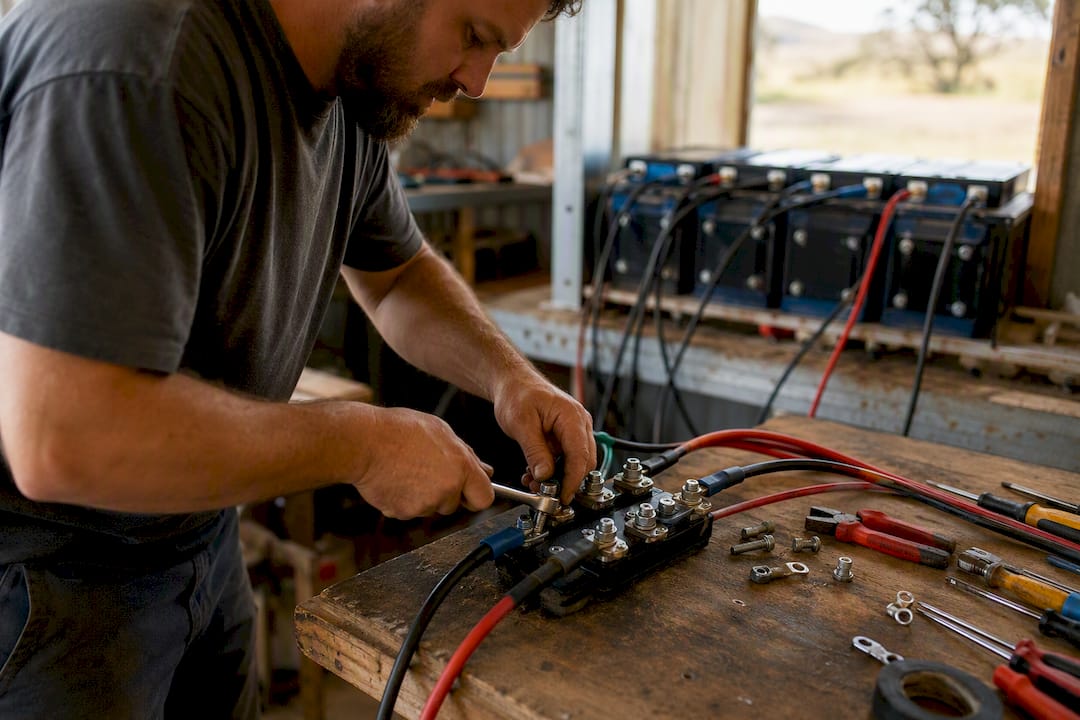
Installation quality matters more than most builders expect, especially at 24V where currents run high. Loose terminal connections, undersized busbars, or poor contact area create resistance points that heat up under load. That heating scales with the square of current too, so a marginal connection at 200A fails faster and hotter than the same marginal connection at 100A. Torque your lugs to spec, use properly sized busbars, and don’t reuse a battery terminal rated for half your actual current.
Which Batteries and Inverters Actually Pair With Each Voltage
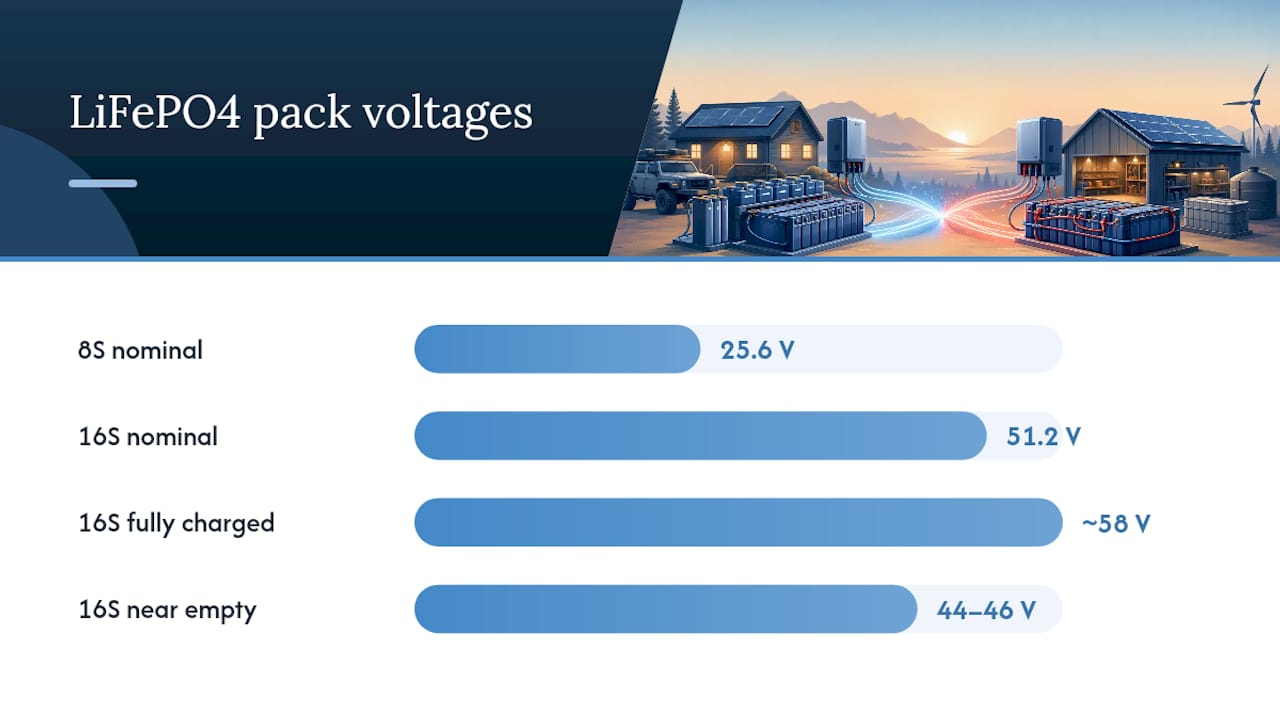
LiFePO4 battery banks are built from series-connected cells, and the cell count sets your nominal voltage. An 8S pack, eight cells in series, lands around 25.6V nominal, which is your standard 24V system. A 16S pack, sixteen cells, lands around 51.2V nominal, the 48V standard. Fully charged, that 16S pack can read closer to 58V; discharged toward empty, it might drop to around 44 to 46V depending on the cell chemistry and BMS cutoff.
That voltage swing matters because your inverter and charge controller both need input ranges that comfortably bracket it.
- Inverter availability: Small to mid-range inverters (under 3,000W) come in both 24V and 48V versions, but once you’re shopping for hybrid inverters or anything above 5,000W, 48V is often the only option on the shelf. 48V rack-style LiFePO4 batteries and hybrid inverters have become the de facto standard for residential and light-commercial storage.
- Running 12V or 24V accessories from a 48V bank: This requires a DC-DC converter, sometimes called a buck converter, to step the higher bank voltage down to what your fans, pumps, or lighting expect. Budget for that converter as a real line item, not an afterthought.
- Alternator charging in vehicles: Most vehicle alternators output at 12V or 14V nominal, which makes charging a 48V bank directly impractical without a dedicated DC-DC charger rated for the voltage step-up. This is one reason mobile builds lean toward 24V or stick with 12V.
- BMS requirements: An 8S BMS and a 16S BMS are not interchangeable. You need a battery management system rated for your exact series count, with balancing circuitry that matches your cell chemistry and charge voltage window.
Getting the cell count and BMS rating wrong isn’t a minor mistake. It’s the difference between a battery bank that charges properly and one that trips protection circuits every time you plug in a load.
Matching Voltage to Your Project Type
Different builds have different constraints, and the right voltage often reveals itself once you’re honest about what you’re actually building.
- RVs and mobile installs. 24V tends to hit the sweet spot here. Component availability in RV and marine catalogs skews heavily toward 12V and 24V, and 48V gear is genuinely rare in that world. If you’re running a large rig with a 5,000W-plus inverter and serious AC loads, 48V becomes worth the hunt for compatible parts, but for most travel trailers and vans, 24V wins on parts availability alone.
- Small cabins and workshops. If your total load stays under roughly 2,000 to 3,000 watts and you don’t plan to expand, 24V works fine and keeps your component count simple. If you suspect you’ll add a well pump, a shop compressor, or a second building down the line, start at 48V. Quiet future expansion is cheaper than a voltage conversion later.
- Whole-home or full off-grid backup. Start at 48V. Split-phase inverters, larger battery banks, and the entire ecosystem of residential-scale hybrid inverters assume 48V as the baseline. Trying to scale a whole-home system on 24V means fighting your wiring and your parts catalog at every step.
- Mobile alternator-charged systems. Weight and space constraints often push these toward 24V, but remember that charging from a vehicle alternator adds real complexity at higher bank voltages, since most alternators aren’t producing anywhere near 48V or even 24V natively.
What Voltage Choice Actually Costs You
The sticker price on cells rarely tells the whole story. A 16S LiFePO4 pack (48V) and an 8S pack (24V) built to the same total kWh capacity use a similar number of cells overall, since you’re just arranging them in a longer series string versus a shorter one with parallel groups. The real cost divergence shows up in the wiring.
- Short cable runs (under 10 feet): The cost difference between 24V and 48V wiring is minor. You’re not moving enough current far enough to matter much either way.
- Long cable runs (30 feet or more): This is where 24V gets expensive fast. Doubling amperage for the same power at longer distances can mean jumping two or three wire gauges to hold voltage drop in check, and heavy copper isn’t cheap.
- Component ecosystem cost: 48V-compatible hybrid inverters, MPPT controllers, and rack batteries are produced at higher volume for the residential market, which sometimes makes them more competitively priced per kWh than equivalent 24V gear at larger scales.
The expensive mistake is building at 24V, growing past your comfortable current range, and then converting to 48V later. That means new batteries, a new inverter, new charge controllers, and often new wiring since your gauge calculations change entirely. Multiple builder writeups point to the same lesson: starting at 48V when expansion is even a possibility avoids paying twice for the same capability.
Safety Basics Every Builder Should Know
Both 24V and 48V fall under the IEC 61140 classification for Safe Low Voltage systems, meaning neither carries the shock hazard of grid-tied AC wiring. That doesn’t mean either voltage is risk-free. The danger with DC low-voltage systems isn’t electrocution. It’s heat, arcing, and fire from high current through undersized or poorly terminated wire.
Practical safeguards that apply regardless of which voltage you choose:
- Use DC-rated breakers or fuses sized to your actual current, not your wishful thinking about future upgrades
- Torque every terminal connection to the manufacturer’s spec and check them again after the first few weeks of thermal cycling
- Avoid running high-current cable near anything flammable, and never bundle undersized wire where you can’t monitor it for heat
- Keep busbars sized for your peak current, not your average draw
Pro Tip: If your system will tie into your home’s AC wiring, involve a licensed electrician for the interconnection point. The DC side may be low voltage, but the point where your inverter meets household AC circuits is exactly where code compliance and insurance coverage start to matter.
Your Practical Checklist for Choosing 24V or 48V
Work through these steps in order, and the right voltage usually becomes obvious by step three or four.
- Estimate your loads. Add up everything that might run simultaneously and record your single largest realistic draw, not just your average.
- Measure your cable runs. Longer distances make voltage drop more punishing, and that pain hits 24V systems harder than 48V ones.
- Check inverter and MPPT compatibility. Confirm the gear you want to buy actually exists at your target voltage and current levels.
- Map your expansion plans. If you expect to add capacity within the next few years, that expectation alone often justifies starting at 48V.
- Weigh weight and space against growth. Mobile builds with hard space limits may still favor 24V even with the expansion tradeoff.
| Your Situation | Recommended Voltage |
|---|---|
| RV, van, or boat under 3,000W | 24V |
| Small cabin, no expansion planned | 24V |
| Cabin or workshop with growth plans | 48V |
| Whole-home or full off-grid backup | 48V |
| Uncertain, but might expand | 48V |
How Design Software Removes the Guesswork
Running these calculations by hand works fine for a single scenario, but comparing 24V against 48V across multiple load profiles gets tedious fast. This is where dedicated design tools earn their keep. A capable platform should simulate your loads, size your cable automatically, match inverter and MPPT options to your inputs, and spit out a bill of materials with cost estimates.
PowerMosaics.com was built specifically around DC, low-voltage, and sub-3,000-watt system design, which is exactly the range where the 24V vs 48V decision is most contested and most consequential. General-purpose energy modeling software tends to assume grid-tied AC or large commercial-scale storage, leaving small off-grid builders to adapt tools that weren’t designed for their scale. A platform focused on smaller DC systems can run both voltage scenarios side by side without forcing you to translate commercial assumptions down to a 2,000-watt cabin build.
| Feature | General-purpose energy software | Sub-3kW-focused DC tools |
|---|---|---|
| Load simulation for small DC systems | Often approximated | Purpose-built |
| Cable sizing by voltage/current | Sometimes manual | Automated |
| MPPT amperage matching | Rarely included | Core feature |
| BOM and cost estimate | Commercial-scale focus | Sized for small builds |
A practical workflow looks like this: enter your load list and run hours, simulate the same system at both 24V and 48V, then compare the cable gauge, inverter match, and controller count each scenario produces. That side-by-side output is usually where the decision stops being theoretical.
Why 48V Won the Argument Faster Than I Expected
Every off-grid build teaches you something, and the lesson that stuck with us at Westernharmonics is how often a 24V system looks perfectly sized on day one and cramped by year two, as demonstrated in this Sungrow Systems lower energy bills — case study. We’ve watched builders add a single water pump or a second battery bank and suddenly hit current limits their original wiring never anticipated. One barn-cooling install started at 24V because the initial load was just fans and a small pump. Within a season, the owner added a workshop circuit, and the whole system needed rewiring to 48V anyway.
The lesson isn’t that 24V is wrong. It’s that most people underestimate their own future loads. If there’s any real chance you’ll expand, run the numbers at 48V first using the checklist above, then decide if the simpler 24V path still makes sense for your specific constraints.
— Chris
How Westernharmonics Fits Into Your Voltage Plan
Whichever voltage you land on, Westernharmonics builds the hardware that gets you cooling and power where the grid doesn’t reach. Our 10W Solar Powered Fan Kit runs as a standalone unit for small mobile or demonstration setups, no battery bank voltage decision required. For builders scaling toward a real battery-backed system, the 200W Solar Hanging Fan Kit with Battery Backup works as a building block you can integrate into either a 24V or 48V bank, depending on how you wire the charge and load side.

A Westernharmonics kit is the right call when you want proven, field-tested cooling hardware without engineering your own fan controller from scratch. When you’re building the larger battery and inverter side of the system, our components pair naturally into the architecture you’ve already sized. Browse the full solar and battery systems catalog to see which pieces fit your project, and start with the kit that matches the load you’re solving for today.
Sources
The IEC 61140:2016 standard defines the Safe Low Voltage classification referenced throughout this guide. NREL’s energy storage research frames the broader tradeoffs between efficiency, cost, and safety in storage architecture. For deeper voltage-specific math, Insum Energy’s battery system comparison and Panels and Packets’ battery bank guide both walk through real current and wiring examples. ShopSolarKits’ voltage guide covers vendor-side threshold recommendations worth cross-checking against your own load estimates.
- 24V vs 48V battery bank for solar: Which should you build? - Panels and Packets
- 48V vs 24V Battery System: Which Voltage Is Right for Your Energy Storage? - Insum Energy
- 24V vs 48V Solar Systems - ShopSolarKits